Hello Remodelaholics! I am Lorene, and I am thrilled to be making my first official appearance here at Remodelaholic. I work here with Cassity behind the scenes, helping with our awesome contributor team, running things over on Facebook (come say hello!) and taking care of various and sundry odds and ends while Cassity and Justin are busy tearing down ceilings and being awesome.
I once dreamt of being a DIYer blogger, but for now I get my blogging fix over at Housewife Eclectic with my best friend Debra and my DIY fix from being part of Remodelaholic! Between crafting spurts (like the Doctor Who themed Christmas tree I made, yes I’m a bit of a geek!) and keeping busy with my 3 little ones (with easy creative projects like this super easy Christmas ornament advent) — I do make time for an occasional weekend project — like today’s gorgeous (if I do say so myself) ornament display tree.
This post may contain some affiliate links. Please see our full privacy policy and disclosure here.

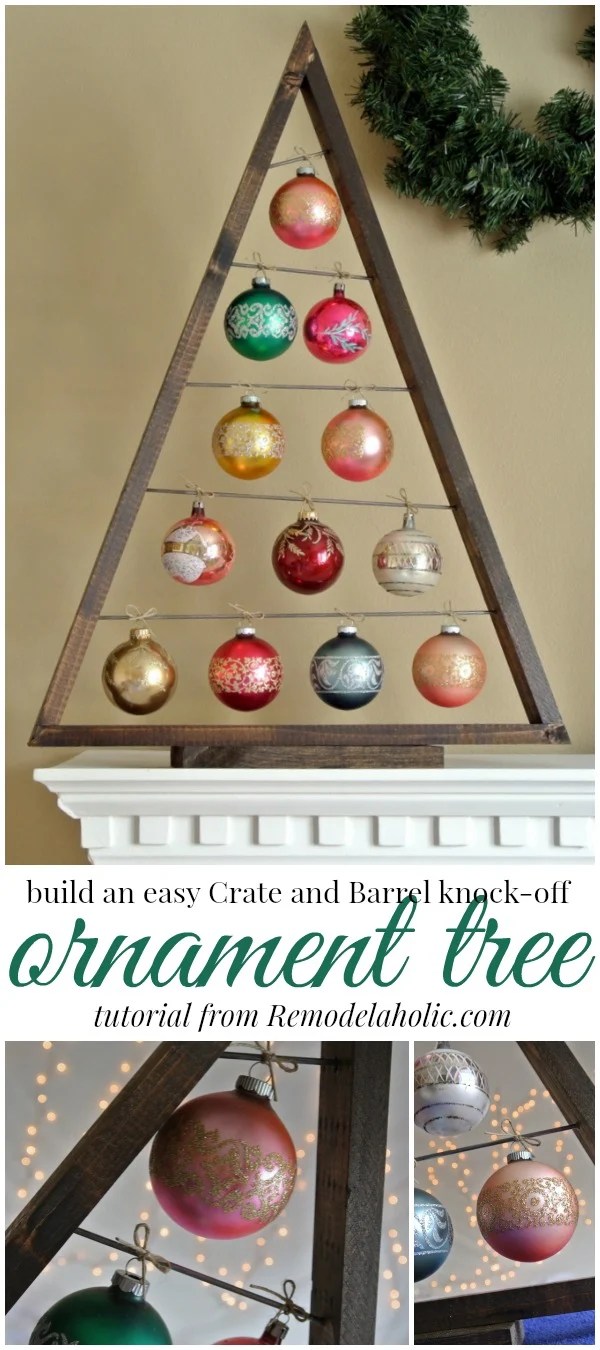
When my husband’s grandmother passed away, we were fortunate enough to inherit some of her beautiful and authentically vintage glass ornaments. Besides being lovely, they hold many family memories, so they are cherished and priceless — and NOT going on my tree with my littles around! I had been looking for a safe way to display them when I ran across this ornament tree from Crate and Barrel —

BUT… it’s no longer available in wood, only in metal. And I LOVE the rustic feel of the deep stained wood. So I called up the awesome Amy from Hertoolbelt and she worked up the plans for me and figured out all the tricky angles. Justin made the cuts for me (see his detailed explanation of cuts and a tutorial for creating a jig to make the non-standard cuts here), and then it was up to me to turn this pile of wood and steel rod into something identifiable:

And trust me — if I can do this, anyone can do this! Just find a friend with a miter saw to make the cuts for you, and use a hack saw and vice (or something else to hold it firmly) to cut the steel rod, and then it’s a simple as drilling a few holes and gluing and nailing/screwing/stapling things together. (I opted for glue plus staples at the corners and screws in the base, and it is nice and sturdy!). I stained mine with one coat of Minwax in Dark Walnut and then tied the ornaments on using thin jute twine.

Paired with our family heirloom angel, Sweet Angie, and one of dear Grandma’s nutcrackers, it makes a lovely festive and memory-filled vignette on my mantel. Just follow the building plan below for the large or small ornament tree (or both!), and you, too, can have a beautiful ornament display — for MUCH less than buying it at Crate and Barrel! And you could easily leave this up all winter and display photos or other small decor items, too.

How to Build an Ornament Tree
Click here to get a free printable version of this building plan

Materials
- 1″ x 2″ board (actual ~3/4″ x 1 1/2″)
- 1″ x 4″ board (actual ~3/4″ x 3 1/2″)
- Jump rings or ribbon/twine
- J-B weld
- wood glue
- 1 1/2″ brad nails
- 1 1/4″ screws (2 or 3)
- wood filler
- sand paper
- stain/paint
Note: Plans are provided for a Large Ornament Tree and/or a Small Ornament Tree. If you plan on making both, purchase an extra 1″ x 2″ board and 1/8″ steel rod.
Step 1 – Large Ornament Tree – Cuts
Cut the 1″ x 2″ into the following 3 pieces. 1 – 27″ long with a miter cut set at 50 deg miter cut on one end and a 20 deg miter cut on the other. 2 – 19″ long with miter cuts set at 20 deg on both sides. 3 – 25 13/16″ long with a miter cut set at 20 deg miter cut on one end and a 50 deg miter cut on the other. (You can eyeball the odd cut angles, or you can make a wedge jig using Justin’s tutorial here.)

Cut a piece of 1″ x 4″ that is 9″ long for the base.
Step 2 – Large Ornament Tree – Holes
On the inside face of the 25 13/16″ piece, drill holes in the center and at the following locations 1/8″ diameter hole about 1/4″ deep.

On the inside face of the 27″ piece, drill holes in the center and at the following locations 1/8″ diameter hole about 1/4″ deep.

Cut the 1/8″ steel rod into the following lengths: 14 1/2″, 11 1/2″, 8 1/2″, 5 1/2″ 2 3/4″.
Step 1 – Small Ornament Tree – Cuts
Cut the 1″ x 2″ into the following 3 pieces. 1 – 16″ long with a miter cut set at 50 deg miter cut on one end and a 20 deg miter cut on the other. 2 – 14 7/8″ long with a miter cut set at 20 deg miter cut on one end and a 50 deg miter cut on the other. 3 -11 1/2″ long with miter cuts set at 20 deg on both sides. (See Justin’s tutorial for making a jig for the cuts here.)

Step 2 – Small Ornament Tree – Holes
On the inside face of the 14 7/8″ piece, drill holes in the center and at the following locations 1/8″ diameter hole about 1/4″ deep.

On the inside face of the 16″ piece, drill holes in the center and at the following locations 1/8″ diameter hole about 1/4″ deep.

Cut the 1/8″ steel rod into the following lengths: 8″, 5 1/2″, 3 7/8″, 1 3/4″.
Step 3 – Both Tree Sizes – Assembly
Assemble the triangle portion of the tree with the rods in place. Apply wood glue at the joints and secure with 1 1/2″ – 2″ brad nails. Use clamps to secure wood while nailing the tree together, to keep your fingers out of the way. Allow the glue to dry.

Center the base on the bottom of the tree triangle, glue and screw into place with 2 or 3 – 1 1/4″ screws.
Step 4
Remove any excess glue, apply wood filler to nail holes, cracks and blemishes and allow to dry. Sand the wood filler and ornament tree until smooth, finishing with 120-150 grit sand paper. Stain or paint and prime as you like.
Step 5
Attach rings to bar with J-B weld or similar adhesive, or use twine or ribbon to attach the ornaments to the bars.


Original article and pictures take www.remodelaholic.com site
Комментариев нет:
Отправить комментарий