Remember our trip to Jubilee where we picked up 4 new-to-us furniture pieces for the home? And remember how they all needed a little love (in one way or another)? Over the weekend, we tackled the first of the four, raising that old media cart to counter height and installing a faux butcher block top of sorts. Now, we have extra counter space! Our first little custom piece for the house! (Another small victory!)
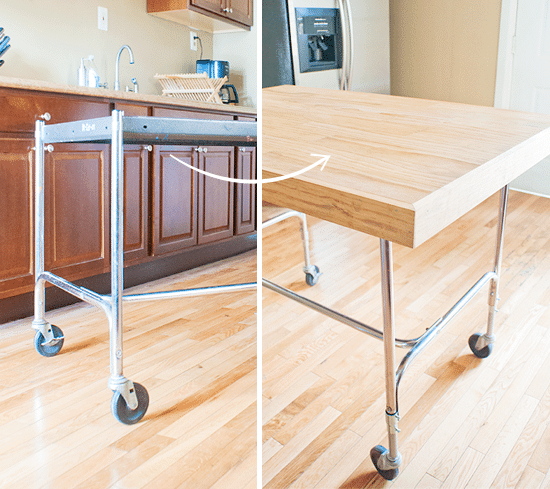
The cart was in good condition, but it did need a good shining and a few alterations to make it really work for us and the space. It was too low for our idea to use it as a kitchen island, and the top was a bit too industrial for our tastes. After toying with the idea of buying a pre-finished countertop (wood? granite?), we decided to just make our own (surprise, surprise!), and as our first real foray into tabletop making (fauxdenza aside), we’re smitten with the results.
MATERIALS USED FOR TABLETOP:
1/2″ plywood, cut to our intended finished size – 32″ x 46″
5 – 8′ 1x4s of select pine (for the tabletop itself)
2 – 8′ 1x3s of select pine (for the tabletop trim)
Danish oil for staining
Mineral oil for conditioning
1″ drywall screws
Wood glue
Finish nails
Wood filler (for touch-up)

TOOLS USED:
Compound miter saw (to cut our 1x4s into different lengths)
Circular saw (to trim the excess)
Measuring tape
Drill
Sanding block / Mouse sander
Rags (for oil)
Hammer
Clamps
Ratchet straps (to hold things in place overnight)
WHAT WE DID: The media cart top was approximately 27″x39″, and we knew we wanted some overhang to create a larger kitchen workspace. Using a 1/2″ thick piece of plywood as our base for the entire tabletop, we had it cut to 32″x46″ at Home Depot, then used the compound miter saw to cut random lengths from the 8′ 1x4s. These would be the cosmetic planks for the actual top.
We played with different sizes as we went along, dry fitting 12″, 18″ and 24″ sections of the 1x4s until we liked the way the grains came together. (Side note: We chose select pine since it was smoother, had less knots, and we knew this would make our job easier in the end. It was double the cost, but well worth every penny.) We knew we didn’t want a perfect grid, rather, we wanted the feel of butcher block – but on a larger scale. Keeping two sides of our plywood square, we did have uneven edges from the different lengths – but that was okay; we knew we were going to trim it to size later.


After piecing our pine together (flipping and re-organzing until we liked the overall look), we glued one piece at a time in place, clamped it down, then drilled our 1/2″ drywall screws in from the bottom of the plywood. This was the longest part of the process, and at some points, we made a game time decision to switch around the pine pieces so they made the tightest fit possible.


With everything glued and screwed securely in place, we flipped over the entire tabletop, then ran our circular saw along the straight edge of the plywood to get rid of our scraggly overhang. (Tip: We used a spare piece of wood as a guide, clamped into place.)


Overall, there were small imperfections and gaps (it would have been close to impossible to get everything perfectly flush), but to be honest, we liked that. Character, we’ll call it! What we didn’t like, however, were the gaps where our trim met, so we cheated the finish with stainable wood filler.

Scott had the brilliant idea to use ratchet straps overnight to keep the 1×3 trim pieces in place (allowing the glue to bond), and the next morning, we got to work sanding. The pine was already smooth, but running the electric sander over everything – especially those corners! – helped to really even out the top. By the time we were done, you could run your hand over the surface without ever knowing that it was made up of several planks. Aah, yes.

While we wouldn’t actually be chopping food or eating right off the faux butcher block, we still opted to give it a darker color with Danish oil – rather than the usual Minwax stain that we reach for. (The Danish oil is more food safe – although there are several online forums where this was tirelessly debated; but again, we really weren’t going to actually eat right off the tabletop.) We opted for 2 coats, giving it a very subtle color and bringing out the wood grain. Again, I say, aah yes. (Yes, yes!)

We allowed this to dry for the afternoon, ran some errands (and accidentally stumbled upon an awesome not-so-little yard sale – more on what we picked up later!), and when we came back, it was time to attach our top to the cart. Scott drilled 4 holes right through the cart’s top – one on each corner – and with our new tabletop laying on the floor, underside up, we flipped our cart upside-down and secured it in place with more drywall screws.

Now, we could extend those legs! The cart was 29″ tall, but our countertops are 36″ high. Once we installed the tabletop, this gave us an extra 1 1/2″ boost, but we still needed another 5″ (give or take). This is definitely a situation unique to us, but after toying around with several ideas in Home Depot (wandering aimlessly for way, way too long – and after many marital disagreements), we came to a conclusion that worked for our bizarrely unique situation. So, if in any way it could work for you (I mean, you’re all raising old media carts, too, right?), here’s the rundown:
MATERIALS USED:
3/4″ conduit pipe, cut in store into four 5″ sections
3/4″-3/4″ EMT to rigid combo coupling (below, the stubby guys)
Eagle One Nevr-Dull

WHAT WE DID: After taking the casters off each leg (they were just pushed in with a little plastic sleeve), we attached the coupling to the exposed cart leg, pushed in a piece of 5″ conduit into the other end of the coupling, then secured it in place using the screws on the coupling. (Can I say coupling again? Coupling.) We also had to shave down the plastic sleeve for the caster so it could fit into the slightly smaller conduit extension, but 30 minutes later with a Dremel, Scott knocked it out of the park.

I used the Nevr-Dull (our absolute favorite for shining up metal!) to buff out some of the rougher areas on the cart legs, but I didn’t go nuts – we actually liked the patina that had built up over the years. And once it was paired with the new top? Well, we think they were made for each other. Tabletop, meet Cart Legs. Cart Legs, meet Tabletop.


For the finishing touch, I’ve been applying the mineral oil every day, and I’ll probably continue to do so for this first week. After that, it’ll just be regular oil maintenance – about once a month. It fits just right in our awkwardly laid out kitchen, and man, this has us itching to get paint on those walls and hang a new fixture and throw down a colorful rug… and! So many things. Gah, you know we’re still hanging out in limbo, but it’ll get there. (Jack’s food station helps, right?)


I’ll admit that there were some second thoughts once we started laying out the plans for the project (at one point, Scott might’ve said, let’s just start from scratch! It’s too much!), but now that we’re done, we couldn’t be happier. It rolls (but can lock, too)! It fits two of our bar stools perfectly! It was made with love, with minimal swearing and only 1 or 2 squabbles for good measure!
Can we start a tally of small victories since demolition has been completed? (Well, mostly, we think; famous last words?) Three. We’re up to three!
PS: Why yes, our backyard really is as bad as it looks. It’s just… Well, we can’t even talk about it. (And like we keep saying, it’ll get there!)
Original article and pictures take www.yellowbrickhome.com site
Комментариев нет:
Отправить комментарий