
We’re talking memories today as part of our month long mission to find ways to eat better, parent better, organize better and just generally live better this year.
Before S arrived, I was actually pretty good about recording memories for our little family. At the end of each month I would use the photos we’d taken to create 2 – 4 new pages in an iphoto book, along with a few paragraphs with family anecdotes, accomplishments, etc. The idea being that at the end of the year I would have a complete book that I could print as a Christmas present to myself.
I kept this up for nearly 2 1/2 years until our second child was born – at which point I totally fell of the wagon. But, hey, at least I knew I had all of C’s baby stuff organized and I told myself that someday I would get to S too… then my computer crashed and I lost all 3 of the books I’d created before I ever got them printed!
Needless to say, that was a bit disheartening. So I kind of gave up on the memory keeping in exchange for keeping up with my two kiddos day in and day out.
But now, with baby #3’s impending arrival, I’m feeling all kinds of guilty about not having a system to make sure that our photos and memories are doing more than just filling up my hard-drive. So I went on a search for a super simple system (one I could actually manage with 3 kids) and found this Vintage Postcard Calendar Journal from Design Sponge.
I knew with a few tweaks I could make this idea into just the system I was searching for – and I did!
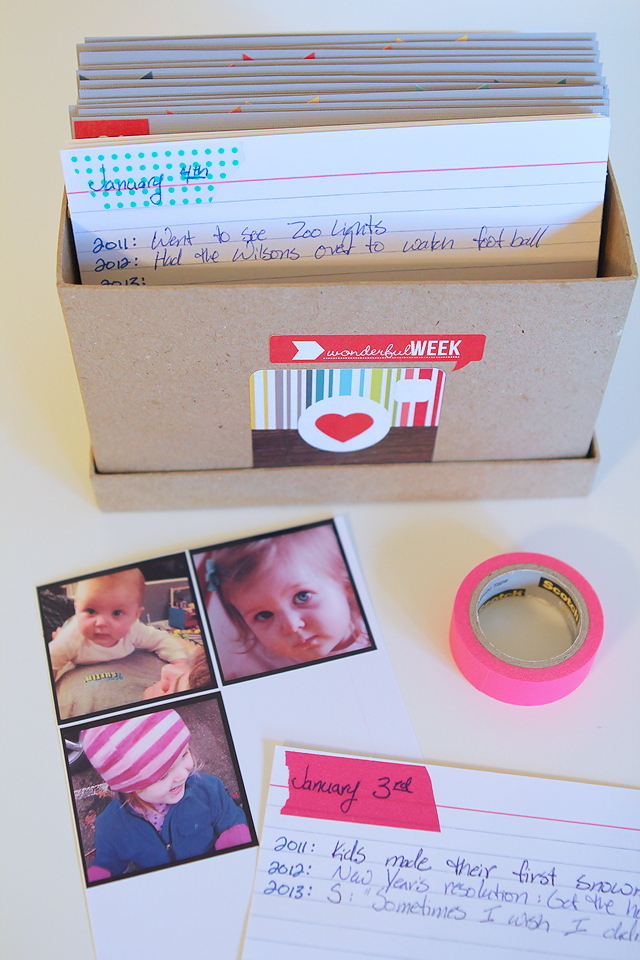
The basic idea here is to have an index card for every day of the year. At the top of each card, place a piece of colorful washi tape with the day of the month written on it. Then on the lined side, write the year and something memorable that happened that day. This could be an adventure you went on, a funny quote, or a milestone one of your kids hit that day. On the back of the same card, place a photo from that day.
Here’s what I love about my new DIY Memory Box:
- There’s little to no prep to get started – Once I got a box and made 12 monthly dividers, I filled the box with empty index cards and was ready to go.
- It’s super quick & easy – All it takes is 90 seconds or less to print out a photo or write down a sentence on the index cards that are there waiting at my finger tips each day.
- It’s a long-term project that shows off how much our family has grown year after year – The point here is to keep this box for years – decades even.
- There’s no pressure – While this system easily lends itself to being used daily, it doesn’t have to be. If nothing special happened that day and no adorable photos were taken, no problem – maybe something worthy of being recorded will happen on this day next year. For now, just don’t make a card for this date yet and move on.
Ready to make a memory box of your own? Read on for the fully DIY…
Step 1: Find and Decorate Your Box
I found everything I needed, including my simple cardboard box, at my local craft store. While there I also found a scrapbooking sticker page full of instagram stickers and monthly date stickers that were perfect for this project and only $1.99. I used a few of the bigger stickers to decorate the box and set the rest aside for the monthly dividers.

Step 2: Make Monthly Dividers
I found some textured gray cardstock and cut twelve rectangles that were the same width and slightly taller than the index cards. Then I labeled each piece with the date stickers (January through December).
Step 3: Start Recording Your Memories
To do this, keep some pretty washi tape and a pen near your memory box.
Each day that you have something to record, label a new index card with the washi tape and write down your memory or affix your photo. The big idea here is that you’ll put another photo/memory on this card next year and the year after, etc. one the same date. Ultimately this will give you a great snapshot of how your life and family are growing and changing year after year.
There are several ways you can go about getting your instagram and smartphone photos onto your memory box cards but, I gotta say, these handy little printers are probably just about the easiest.
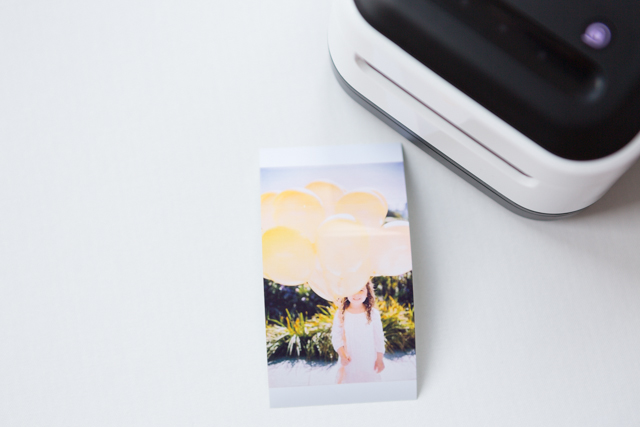
The wireless, app-based, mobile, and (get this) ink free printer uses rolls of adhesive backed paper that are 19 feet long and available in 3/8”, 1/2”, 3/4”, 1”, 2” widths. So basically you can keep these little guys anywhere (in your pantry, your car, or even your purse) and use your smart phone or tablet to instantly print up labels, business cards, or photo stickers for your memory box.
The ZINK hAppy allows you to wirelessly print content from your apps, as well as create and design from several ZINK apps using:
- Android smartphones and tablets
It retails for $199 .
More Helpful MPMK How-Tos from this month:
Oh, and speaking of phot0s, did you hear?
Amazon Prime now include UNLIMITED photo storage (plus 1,000,000 songs, 40,000 movies & TV shows, a kindle lending library, and free 2-day shipping). Get your free 30 Day Trial here.
*Post contains affiliate links.
Original article and pictures take modernparentsmessykids.com site
Комментариев нет:
Отправить комментарий